I have written so much articles on the installation of DStv and other satellite TV services. I have also given the settings and frequencies of DStv and other decoders for use during installation and signal tracking. However, it takes more than just tracking a satellite dish and setting the DStv decoders rightly to pick signals. Most importantly, there must be a well set-up satellite dish, before tracking and decoder settings can ensure. Therefore, if you wish to know how to couple up the different small parts of a satellite dish to fully set it up, then this post is best for you. Even if you are not an installer but wish to do it yourself, dish set up has been simplified here for you. Therefore, you will learn in this article how to set up a satellite dish – couple parts to full installation, in texts and pictures.
At first, it might be a little confusing when you newly purchase a satellite dish and decoder system. This is because, it usually comes with neatly packed nuts and bolts, screws and small components, which all form part of the satellite dish. While unpacking the package, be careful not to misplace even the tiniest screw as they too are useful in setting up the satellite dish. A single nut or screw lost might affect the entire dish setup, due to incomplete coupling.
The steps for setting up a satellite dish given in this article works for all types of satellite TV dish and decoders, including DStv, Multi TV, Startimes Dish etc. Now let us take you into the satellite dish setup procedure from parts to complete coupling or installation.
Different Parts of the TV Satellite Dish
To better understand the setting up of a satellite dish from parts to full install, you need to know all the parts that come with a dish system. I will try to describe them briefly, to make them easilly identifiable for easy application. They are as follows;
- Satellite dish pan
- L-rod Angle support
- Neck Stem rod
- the base
- 2-arm holders
- LNB
- LNB holder
- Screws and nuts (varied sizes)
Now let us explain them one after another
The Satellite Dish Pan
This is the big oval or round pan usually between 120cm to 60cm in diameter. This is actually the most conspicuous part of the satellite dish system, usually seen from afar as the dish basin. Depending on the network service you wish to install, the size could vary. You may read up how dish size affects satellite signal reception.
L-rod Angle Support
in the setup of a complete satellite dish from small parts, this is the length of iron that protrudes from behind the dish pan to some distances to its front. In function, the L-rod provides the point of attachment and proper position for the LNB.
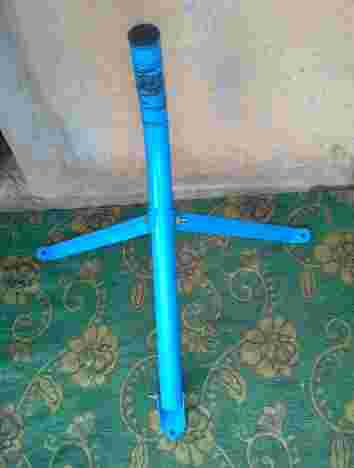
Neck Stem Rod – Satellite Dish Holder
As the name implies, this is the strongest and largest iron support for the entire satellite dish setup. It runs from the foundation to the point where the dish pan is attached to. In fact, it is called the foundation rod because it carries the entire weight of the satellite dish setup. However, the neck stem rod is semi-L-shaped in a 120 degree inclination.
The Satellite Dish Base
This is a semi-flat solid metal, which provides the base support for dish take-off. Whether it is mounted by the roof side, wall or anywhere, the base rod is always deployed for strong foundation hold. However, mounting the satellite dish on a pole would keep the base away, as the pole is usually dug into the ground.
2-Arm Holders
These are two identical iron rods with perforations at both ends, which are attached to hold the neck stem rod into position. A closer look at the 2-arm rods would show that both are intelligently twisted to collectively give a balanced hold. Consequently, the twists work together to project the attaching neck stem rod towards the proper angle and position.
The LNB and Holder
to the inexperienced, the LNB is that small device like a camera, which points at the mouth of the satellite dish. However little, this is actually the most important part of every satellite dish. It is the component that captures incoming TV signals from the sky. However, the LNB is useless without its holder. The LNB holder is usually plastic and white in color, which holds or fastens the LNB into position. Bothe are fixed on the L-rod angle support and fastened by screws and nuts.
Satellite Dish Screws and Nuts
The screws and nuts that come with a satellite dish package exist in different sizes. However, you should be intelligent enough to try each screw for fitting during the coupling of the satellite dish. Always apply care when using these screws to ensure none is lost or wrongly used.
now that we have understood the different parts of the satellite dish components, let us go ahead and set it up. Follow the directions below to unpack, couple and set up a satellite dish for TV etc. Therefore, you must consider two factors as you are about to set up a satellite dish – Good signal and heavy wing dislodging. Set up the satellite dish properly for the best signal reception possible, while considering solid installation to prevent wind or other disruptions,
- On the big round dish pan are four holes, fasten two hinges from behind and tighten with four selected screws and nuts.
- The hinges have provisions for attachment of the L-rod and the neck stem support. Fix these accordingly and attach firmly with appropriate screws and nuts until the set up looks like this.
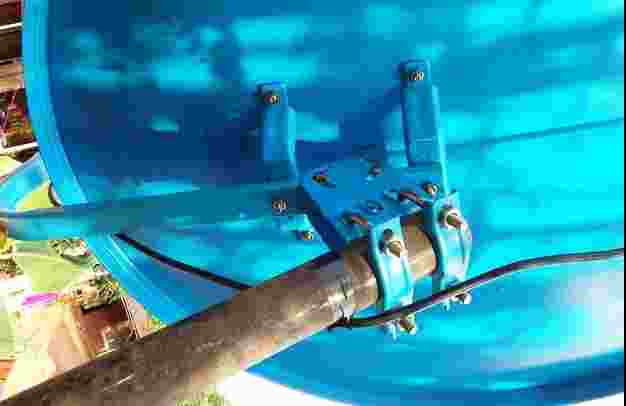
- After that, fix the LNB unto the holder and attach them to the mouth end of the L-rod. Please ensure that the LNB is made to face the satellite dish pan, by its white circular end.
- then bring the 2-arm support identical rods and attach to the neck stem. The neck stem rod and the two identical 2-arm holders should look like the image below.
Hoisting the Satellite Dish after Coupling
Before mounting the satellite dish pan unto the neck stem, make sure the latter had been firmly nailed either to the roof side or wall. Either of these two, the Base would be used. However, if you wish to mount the satellite dish to a pole, then there is no need to use the base. In this case, the neck stem might be replaced by this pole, which must be of same size in circumference. However, the pole must definitely be longer in length.
Finally, hoist the satellite dish pan unto the neck stem rod tighten the screws partially. The essence of partial tightening is to give room for twists and turns during signal tracking. Looking at the satellite dish mounted up, finally connect the RF coaxial cable from the decoder to the LNB using an F-Connector.
At this point, you have successfully set up a satellite dish. You are now ready to track signal for your desired network