To root Android 5.0, 5.1 Lollipop is assuredly the best way to unlock even more features of the device powered with this android OS. Users and mobile phone engineers now see the rooting technique as a veritable means of gaining deep control over what their android can do. Furthermore, rooting android may destroy a device’s warranty while giving better functionalities in service to the user. Therefore, we are looking at how to root android 5.0, 5.1 and other versions. The procedures to root android and the applications shall also be treated in this article.
Root Android – Meaning and Implications
According to Wikipedia on Android Rooting, allows users of the Android mobile operating system to attain privileged control (known as root access) over various Android subsystems. Because the Android is a modified version of the Linux kernel, to root an android OS opens all potentials. In other words, rooting an Android device gives similar access to administrative permissions. This is similar to Linux or any other Unix-like operating system such as FreeBSD or macOS. Hence, you may call android rooting as the window to becoming a superuser of the android mobile operating system.
However, I shall always discourage discourage android rooting because it can potentially damage your Android device if the rooting procedure goes wrong. This is why we shall prescribe safe methods to root android 5.0 and others in this article. Certainly, you lose your phone’s warranty once you root the android OS. However if one must root an Android device, it should only be done under the right circumstances. More importantly, it should be done with the right tool. Therefore, we shall list some safe procedures and tools that are right to root android 5.0 and others with.
Root Android 5.0, 5.1 Using the KingoRoot.apk
- STEP 1: Download the Android Rooting app for free on KingoRoot.apk . You will download it directly to your Android. You can find it in the folder “Downloads” on your phone. As you open the browser on this link, a prompt appears on screen requesting OK to continue. Click OK to proceed.
- STEP 2: Install the apk file of KingoRoot.
You may likely encounter some challenges during installation of the apk rooting app. However, follow all the instructions that appears on screen for a successful installation. Therefore, one of such problems may be the Install Blocked notice. In this case, follow the SETTINGS to resolve it this way. Settings > Security > Unknown sources > Check the box and allow. You device may only accept app installations coming from its original app store. For instance, Google Play for most android mobile devices and/or Samsung Apps. The apk file of KingoRoot downloads directly from the server of Kingo and will not be able to install on your device unless you allow installing from “Unknow source”.
- STEP 3: To open the Android rooting App, tap the icon of KingoRoot and press “One Click Root” to begin. It is important to ensure that you have stable Internet connection when rooting with KingoRoot. This is very critical because the rooting scripts store in Kingo’s online server. Therefore, no successful android rooting with Kingo will occur.
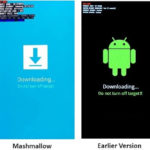
- STEP 4: Results of the Android Rooting Appears – Succeeded or Failed.
How to Root Android 5.0, 5.1 and Others Using dr.fone-Root
One of the best tools for rooting an Android 5.0 and 5.1 and other device is dr.fone-Root.
These are some reasons you should use dr.fone-Root for your Android optimization via rooting; They include;
- It is free of charge to use the dr.fone – Root
- By just a click, your Android 5.0, 5.1 lollipop is rooted.
- It’s fool-proof, hasle-free, safe to use without damaging your Android device and above all, very simple to use.

Step by Step to Root Android 5.0, 5.1 and others Using dr.fone-root
It is wise to back up all data on your android device. This is to safeguard the data in case something goes wrong. Its important to ensure your device has enough battery life and maybe a standby charging source before you begin to root your Android.
Enable USB debugging before you can root the device.
Disable the anti-virus on your PC to ensure it doesn’t interfere with the process, as your Android device is connected to a PC for it to be rooted.
Download and install dr.fone-Root to your computer.
Connect your Android device to your computer by using a USB cable. Click on the message that pops up on your phone device screen and select USB Debugging. This is very important.
Launch the program on your computer. From the tools on the primary window, click on “Root.”
The moment the dr.fone-Root recognizes the device, click “Start” to continue. It will begin to search for the best way to root the device. The process may take a while depending on the device model.
The dr.fone – Root tool will indicate when it is ready. At this juncture, you click “ROOT NOW” and the process begins immediately.
During the root process, you may have to confirm that you want to root the device. Tap “Confirm” on your device to continue rooting your Android 5.0 or 5.1 lollipop device.
In few minutes, the rooting is successfully completed. Your Android 5.0 / 5.1 device would have been librated or optimized for its highest potential in use.